Showing posts with label Easter. Show all posts

Sunday, March 31, 2013

Birthday Card - Happy Easter


This was in my mailbox on Friday. How gorgeous is this card!! 
Created by my friend Lisa Howell. It's so beautiful in person, crafted with all my favorite things!

The inside, just as pretty.

Thank you so much Lisa!
 I'll treasure it. I'm always the one giving handmade cards etc. It's so nice to be on the receiving end. 

My son sang Happy Birthday to me yesterday when he woke up. It was the best present I could have received!! We are going to have dinner and some Cheesecake later on today.  He told his dad that's the kind of cake I wanted. Even though I do prefer chocolate. LOL That's his favorite! Just have to laugh. 

Would like to wish you all a Happy Easter. 
Have a Wonderful Day!
Michelle


Sunday, March 10, 2013

Yummy Chocolate Bunny Pattern & Sale!


ScrappyDew is having and awesome sale this week! 80% off an order total of $35. They have been busy adding new files to the store every week. Be sure to stop by and check out their great selection of patterns.


Have a great Sunday!
Michelle

Tuesday, March 5, 2013

Easter Card

Had some free time this afternoon, decided to make an Easter card.
I used two different embossing folders by Darice, Cloud Sky and Spring Tulips. I applied some Pebbles Classic Chalk to the cloud edges and flowers.


I did a Print & Cut using ScrappyDew Easter Bunny Kids cut a oval scalloped mat using purple Recollections Textured Cardstock. Applied some purple Stickles. 


Martha Stewart Edge Punch was used for the white and purple textured cardstock. My Thoughts Exactly Easter Greeting Sentiment stamps. 

Thanks for stopping by!
Michelle

Saturday, March 24, 2012

Easter Egg Card


Good Morning everyone!!

Here is an egg card I finished early this morning. It was started during the week but had some bad news and I just got back to it. 
I have seen different versions of the card last year on blogs, so I can't take credit for it. 
I had downloaded the egg file from Paulo's blog some time ago  Here  If you have not visited his blog, I suggest you stop by and check out all the wonderful files he has to download. He is very generous in sharing his work. He was active on the MTC Forum but have not seen him post in a while. He is a Pediatric Surgeon and I'm sure he is very busy.


The base of my card and the green flourish is Recollections Signature Cardstock. You only get 25 sheets in a pack, but the sheets are very thick like Bazzill cardstock and they cut so nice with the Expression.
The green flourish is a file by Penny Duncan She once again had her files available for download, but many were downloading them all at once and Sky Drive blocked her from her own files. I think she is trying to find another way to offer them again. I'm so glad I was able to download her Shapelies a little at a time last year, I don't have them all but a good bit of them. You can also purchase the files on CD at her Etsy store.
The flowers are Recollections, I added a green Rhinestone to the centers. The ribbon is Dots and Dashes by Offray. 
I also applied some purple Stickles to all the small circle cutouts in the egg. When cutting the egg file, you want to have a fairly new mat and blade because of the intricate cuts.


For the inside of the card I took the solid egg shape and just re-sized it smaller for all the layers. When I would do a shadow layer it was changing the shape all together. Also, I just snipped a piece of the green flourish and added another flower and attached them to the bottom layer. 
I did stamp and egg and a Happy Easter sentiment on the left inside of the card. Forgot to take a photo of it. LOL
I hope you enjoyed my egg card and maybe inspired you to make one of your own.
Have a great Saturday!
Michelle

Friday, March 16, 2012

Little Easter Chic Card


These Little Easter Chics are so cute! 
Today's card is based on this weeks Mojo Monday Card Sketch. I need to pick up some Easter stamps. I probably will add a sentiment at a later date. 


I used Scrappy Dew Little Easter Chic set to create my card. Check out all the cute files included in this set!


2 cards down and 3 to go. LOL Maybe I will get all my cards done this time.
Thanks for looking!
Michelle

Friday, March 2, 2012

Easter Basket Card


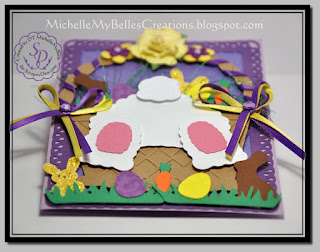
Hello everyone! I'd like to share a new Easter Project with you today. I used ScrappyDews Bunny Kids Set and the carrots are from the Easter Town Set .

The frames on the outside and inside are from Monica's Creative Room, the set is called Elegant Frames.

The chocolate bunny is clip art I brought into MTC and did a pixel trace on. I applied some yellow Stickles to the little peeps. The flowers are Recollections, I adhered Rhinestones to the center. I wrapped some thin ribbon along the basket handle. I added the ribbons to the side of the handle at the last minute, I think I should have left them off because they hide the basket. The green ribbon fibers I purchased on clearance at Ac Moores this week for $1 a spool. I really like the look. I used a Argyle embossing folders on the basket and Swiss Dots on the purple background of the frame.


The sentiments are Word Art by Studio Bethany. I brought them into MTC, pixel traced them and printed them out. I added some more of the elements to the bottom of the frame.

Some more additional photos.


Thanks for looking!
MichelleMyBelle

Sunday, April 24, 2011

Happy Easter!!

Just waned to wish everyone a Happy Easter. Enjoy your day with Family or Friends, it's going to finally be a beautiful day here.

Saturday, April 23, 2011

Easter Card

Files Used:

RM00142 Easter Flower Collection
I also used the Bracket Mat  from her Layouts Elements 1, RM00108 File Here.

First off, I have to say that Sharon's files cut like butter! My Daffodil is very
small, just shy of 2 1/2 inches tall. So you can image how small the stamen had to
be cut. I was amazed that it cut and stayed in one piece and did not rip during the
cutting process, they are like fine hairs, LOL.

For my mat I used a Cuttlebug embossing folder and added some Glitter. I purchased some
Studio G at AC Moores (dollar bin) but I don't like the thick glue they use. The tip is also
not a fine tip so I could not get a good outline around the mat like I do when using Stickles,
which I like so much better. I added yellow Stickles to the outer edge center of the
cup of the flower. I also used the McGill Stylus on the petals of the daffodil and the leaves a bit.

The sentiment I typed using Make The Cut and printed on my printer using Edwardian Script ITC, love that font.


Supplies Used: Studio G Glitter Glue
               Bazzill Yellow Card Stock
               K&CoMPANY Paper Abrianna
               Make The Cut Program
               CuttleBug Embossing folder 
If you would like the File for the card, you can get it HERE. Minus the flower.

Thanks for looking, Michelle

Friday, April 15, 2011

Tissue Paper Egg

This egg is what you will be making. I want to first say that this idea I came up with on my own. If by chance it resembles someones tutorial I did not copy from it. (smile)


I have made many chicken eggs with beads and ribbon through out the years. I would blow out the yolk and let it dry out for a couple days and then decorate them. After many years of storage they become brittle and crack, so I was trying to find another way of making eggs. This is what I came up with, they are very inexpensive to make.


Supplies: Flowers from RSMobleys Designs Deepest
               Sympathy Lattice Card Here
               Colored Tissue Paper
               Plastic Eggs that have flat bottom and open length
               wise instead of accross. You want a flat bottom
               so they will sit and not roll around.
               Mod Podge    


I purchased all supplies at the dollar store except for the Mod Podge.


I started out with this egg and cut the ears off. You can click on the photos, they open up larger so you can  get a closer look if you need to.


Next I put some water in a small dish and added some Mod Podge, it's very watered down.


I cut some tissue paper in strips and not in any particular size as you can see by my strips. This was my first try at making the egg.


Next I dipped the paint brush in the Mod Podge solution adding strips of tissue paper and pasting it to the inside of the egg. You want to make sure the strip goes up the side of the egg a bit like in my photo. I don't know how many layers I added, maybe 7-9. I did not count.You want to make sure you don't see any of the pink of the egg showing thru the tissue paper. You will do the second egg the same way.


Now, once you are finished adding all the tissue paper to your eggs you will put a coat of non-diluted Mod Podge on the inside of the egg being very careful and painting it on gently. Because the tissue paper is wet you don't want to shred it. Once the first layer of Mod Podge is on you will let the eggs dry overnight.

You are going to apply several coats of Mod Podge letting each of the coats dry before applying another one. I applied 5 coats to each egg. Once the last coat is dry the tissue paper egg will pop right out. This is what is looks like in the photo below.


Now you will apply 5 coats on the outside of the egg, letting each coat dry in between. Important: Before applying the first coat you want to wet your brush with water and brush over the top of your egg. If you still have your diluted Mod Podge you can use that or make more.  DO NOT SATURATE IT! While still wet you will apply the non diluted Mod Podge over the top of your egg. You can hold the excess edges while applying the coats of Mod Podge. You don't want to apply it below the line, because later you will be cutting it off.

Ok, once all the coats are dry you are going to cut the excess of the tissue paper off right at the line. I used baby or nail scissors they worked perfectly because of their small size. You will notice once the eggs are all dry if you tap it on the counter a little they sound like the are plastic. LOL


You will put the tissue paper eggs back into the plastic egg. Next you will cut a strip, I just took a piece of heavy white card stock but you could match the color of your tissue paper. You are going to take the strip and glue it to the inside of the egg. If you look at the egg one has a lip or edge on it. That is the one you want to glue it to. The reason you put the tissue paper egg back inside the plastic one is because when gluing the strip you have to add a bit of pressure to the side of the egg. The plastic egg supports the tissue paper one so you don't crush it.


You want to make sure the strip is above the egg a bit. The top of the egg will fit over the edge of the strip.


Make sure the strip is thoroughly dry before putting the top on.


Now decorate your egg. I used the Mod Podge to glue on my ribbon. I tried all kinds of glue and it was not working. I even tried hot glue but that made the ribbon look bulky where the glue was applied.


My finished egg decorated. What I did when putting the ribbon on, I only glued half of it to the top so when the top of the egg fits over the strip the bottom of the ribbon hides the edge a bit. That's about it, if you have any questions just ask. Would love to see your finished eggs.


Michelle


Easter Card

Feels like forever since I have made anything. My grandmother is doing better and they moved her to a hospital closer to me.


For this card I used a SVG Cuts File. It's the Easter Egg from the Waterfall Cards. I also used the Easter Cross from MyScrapChick. I used Cuttlebug embossing folders on the cross and the egg and Stickles on the outside of the egg and cross. I wanted to use popdots on the cross but because I'm going to mail it I opted not to. I printed the sentiment, the font is Palace Script MT.

Thanks for looking.

Tuesday, February 22, 2011

Egg Boxes


I created these boxes yesterday after a snow storm we had, 9 inches. It has been such a long winter so far,  looking forward to spring.


Here are the supplies I used:

Egg shape from MyScrapChick, but in the file I have supplied another egg in it's place.
Penny Duncan's Calla Lilies file
Home made Glimmer Mist on the cross
Downloaded a free scroll saw cross pattern online and made a file
Downloaded a clip art egg and pixel traced it,
Storybook Cartridge for leaf
Cuttlebug dots embossing folder
Lace
Gems from ACMoore $1 pk for 60


The file links are below. Would love to see what you create.

I'm not a tutorial writer so I hope you understand it. If you have any tips on how I can make it better don't hesitate to contact me. I don't mind .  


Here is the tutorial on how to make my Egg Box.   Here is the MTC file. 


Have a great day,

Michelle