Showing posts with label MyScrapChick. Show all posts

Thursday, January 19, 2012

Bear Eyes Tutorial Using MaketheCut & MyScrapChick Eyes


I'm not going to go through all basic steps of using Make the Cut with this tutorial to produce the eyes. This tutorial is being done with hopes you have a basic knowledge on how to use the program. I’m using Make the Cut to complete this tutorial.
I’m also using the free printable eyes by MyScrapChick with permission. They are PDF's and I have imported them into MTC. You can get them here: I'm using them solely for the purpose of the tutorial, and not to break any copyrights. 

If you are not familiar with MyScrapChick's designs, you can check out all they have to offer Here  They are having a wonderful sale also, 60% off any $10 or more until Jan. 20th, 2012.


After importing the PDF, this is what it you should have.  


Now you have to break apart the layers to work with them. 


You will click on the imported faces to select them and click on break. This is what you should have. 


Now, what I'm going to do is draw a box around one of the faces and copy and paste it on a new layer. This is what your layers should look like.


 You want to delete the layer with all the faces, click on the red X. 


Now we are going to delete all the unwanted layers we don't need. But first, select your face and put it on its own layer and move it to the bottom. Change the color to white and lock the layer. This is what you should have. 


Now delete the straight line, next select your eyes and resize them larger so we can work on them. Each of the eye layers contains two shapes each. What you want to do is delete all the extra pieces. So you end up with this. 


Also, go ahead and delete the lash pieces on the left eye. We won't need them. I colored all my layers accordingly. My mat is set on Contrast.


Now, what you are going to do is put your lash pieces on a separate layer. You will move that layer under your eye layer. Your layers should look like this. Also lock your eyes so they don't move during the next step. Click on the little green pad lock to lock it.


Now we are going to create our lashes. Make sure you are on your lash layer for this next step, you'll want to copy and paste the lashes pieces and arrange them along the outer edge of your eye. You want to alternate the lashes to make the eye look natural. You can rotate the lashes, mirror them etc,. You should have something like this. 


I also duplicated the white circle of the eye and re-sized them accordingly, to create the catch lights of the eye. Now put them on a new layer, copy and paste and mirror them.
Using the arrow keys on your keyboard move them into place on the second eye. Lock this layer. You should have something like this now.


Next, select your lashes, you want to copy and paste them onto a new layer, then mirror them. Making sure your lash layer is beneath the eye layer.  Once again with your arrow keys move them into position on the second eye. This is what I have now. 


 Now, we are going to unlock our eye layer, you want to copy and paste the whites of the eye and put them on their own layer. They can remain on top for the next step. Now re-lock your eye layer and the small white circles of the eye, and hide them.  You should have something like this.


So, the only things you should have showing are the lashes, your head and your duplicate whites of the eye. Now go to File- Print Options- check Show Paper on Mat and Print Shape Outlines, click OK.


Because I still use the Expression, I have to print my head and hand cut it. If you have a better machine you can  do a Print n Cut. I will not go into this step, hopefully you already know how to do this with your particular cutter. Also, test this on scrap paper before printing to the card stock you want to use. Once your head is printed then hide all these layers. Now unhide your eye layer and the small round circles of the eyes.  Print them out on either mat or glossy photo paper and cut and adhere to your project. You can also do some shading on your lashes with chalks before adhering the eye. Tip: I also run a black marker on the outer edges of the printed eye to hide the white on cardstock or photo paper.

Now, because I used an eye shape from another purchased design on my bear project here, I could not share that file with you. That is why I’m doing the tutorial using MyScrapChick’s free printable eyes. I also used the Crescent basic shape from within MTC and Node Editing tools to create my eyes on that project. So it was much easier to show you this technique using MyScrapChick’s eyes.
Now when creating your projects, all you have to do is re-size your eyes if needed, re-color and print. You will have perfect eyes every time.  You can now use this technique to create different types of eyes. I hope you've found this tutorial useful.
If you use this technique please credit me and MyScrapChick and don't claim for yourself. It was trial and error to come up with this.
Thank You


Have a great day!

Michelle


Sunday, January 8, 2012

MyScrapChick Challenge


We are having our first challenge of the year on the MTC Forum featuring myscrapchick. They have provided a file for us to work with, Bug Cards. Thank you Val and Kristi. You can get more info Here

This is the card I created using the file. I have to run out and get some more Valentine paper, this is from last year. I created the heart frame in MTC, I also applied some heart glitter to the frame in between each heart. It looks great in person. I used the Swirl and Heart embossing folders also.


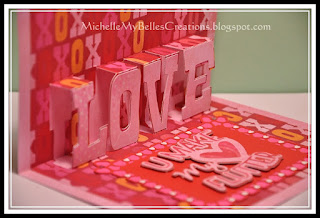
This is the inside of the card. I also used myscrapchicks free file this week, Love PopUp Card. You can get a free file every Friday in their weekly newsletter. You can go Here to sign up for the newsletter.


I used my same frame for the inside of the card also. This time applying some white heart glitter in between each heart on the frame. I love the glue that came with it because it has such a small tip. Perfect for applying these tiny hearts, LOL

The sentiment "U Make My Heart Flutter" is from SVG Cuts, the free Valentines Captions which you can get Here. It was perfect for the card challenge.


Supplies Used

Martha Stewart Heart Glitter and Glue
Various colors of cardstock
MyScrapChick Bug Cards and Love Popup Card
K & CoMPANY Valentine Paper
SVG Cuts Valentine Captions
StarDust Stickles

Friday, January 6, 2012

MTC First Featured Challenge of the Year!

The Forum's first challenge of the year is featuring MyScrapChick.com Designs.

What do you get when you mix a mother-in-law-daughter-in-law who have a passion for helping other succeed? You get the creative duo, Val and Kristi, of http://www.myscrapchick.com . They get a special satisfaction from helping others create because of the designs they create and sell. They know what it is like to struggle to pay an unexpected bill, so if they can help others make an extra income by using our patterns to make things to sell, then they too have succeeded. The products at myscrapchick.com are not just for the stay at home crafter. They cater to the work at home crafters as well.


You’ll find a variety of files at their website including 3D designs, cards, paper piecing graphics, and collections. You won’t break the bank either at their handy dollar store section. Make sure you look around to catch their tutorials too. But that’s not all. Sign up for their weekly newsletter to not only keep up to date on new products but to get their weekly Friday freebie.

 Check out this four fantastic bug card set freebie they are offering just for just for our MTC challenge. You can sign up for the newsletter at the same time.=D

http://www.myscrapchick.com/springcards/

Complete one of these cards OR use a myscrapchick file you already own and post it before the end of Jan. 14th to be entered for a $10 product prize from myscrapchick.com. Let see what inspires you with these adorable cards.

You can post your completed projects Here on the Make the Cut Forum.

Thank you, Kristi and Val for sharing your designing talents with us all!

Show your support. 

  Good Luck everyone!!
Michelle

Friday, November 4, 2011

Additional Halloween Projects! Bag and a Card


For my bag project, I used Sharon's Spider Web Frames and Borders File, RM00158. The roses I chalked purple and then sprayed them to set the chalk. I sprinkled some of Martha Stewart's Mirco beads on the roses. 

On the corner bats, I applied some purple Stickles. I also used some of Ranger's Liquid Pearl's on the center half of the spider webs. The bag I believe is from Big Lots and the little ghosts is from K&C0MPANY. 

My frames is cut at 4.25 x 5.5 inches and the center border and mat are cut at a little under 4 inches. 

Supplies Used: 
Scrappin with Sharon & Smokey Spider Web Frames and Border Cutting Files
Ranger Liquid Pearls
Ranger Purple Stickles
Black Cardstock
DCWV Neutrals - Grey Cardstock
K & CoMPANY Kelly Panacci Halloween Accents - Ghost
Handmade Roses Chalked
Green Leaves
Black Bag - Big Lots


This was a free download file from MyScrapChick.com,  you can purchase it here for $1.00. Be sure to sign-up for their newsletter to receive free patterns every week. 

My son helped make this card for his grandma and grandpa and we kept it simple. I chalked the edges of the card and applied some Stickles to the ears, cheeks and the cut out letters. 

Thanks for looking and have a great day.
Michelle

Friday, July 22, 2011

Ornaments


Finished these this afternoon. It's to hot to be outside so I did some crafting instead. I used MyScrapChick Ornaments, some AC Textured CardStock, Ac Foil Paper and Ribbon that was on clearance at Michaels. Ran the Stylus around the edges of the cuts.

Thanks for looking
Michelle

Friday, April 15, 2011

Easter Card

Feels like forever since I have made anything. My grandmother is doing better and they moved her to a hospital closer to me.


For this card I used a SVG Cuts File. It's the Easter Egg from the Waterfall Cards. I also used the Easter Cross from MyScrapChick. I used Cuttlebug embossing folders on the cross and the egg and Stickles on the outside of the egg and cross. I wanted to use popdots on the cross but because I'm going to mail it I opted not to. I printed the sentiment, the font is Palace Script MT.

Thanks for looking.